The Bean – 2012

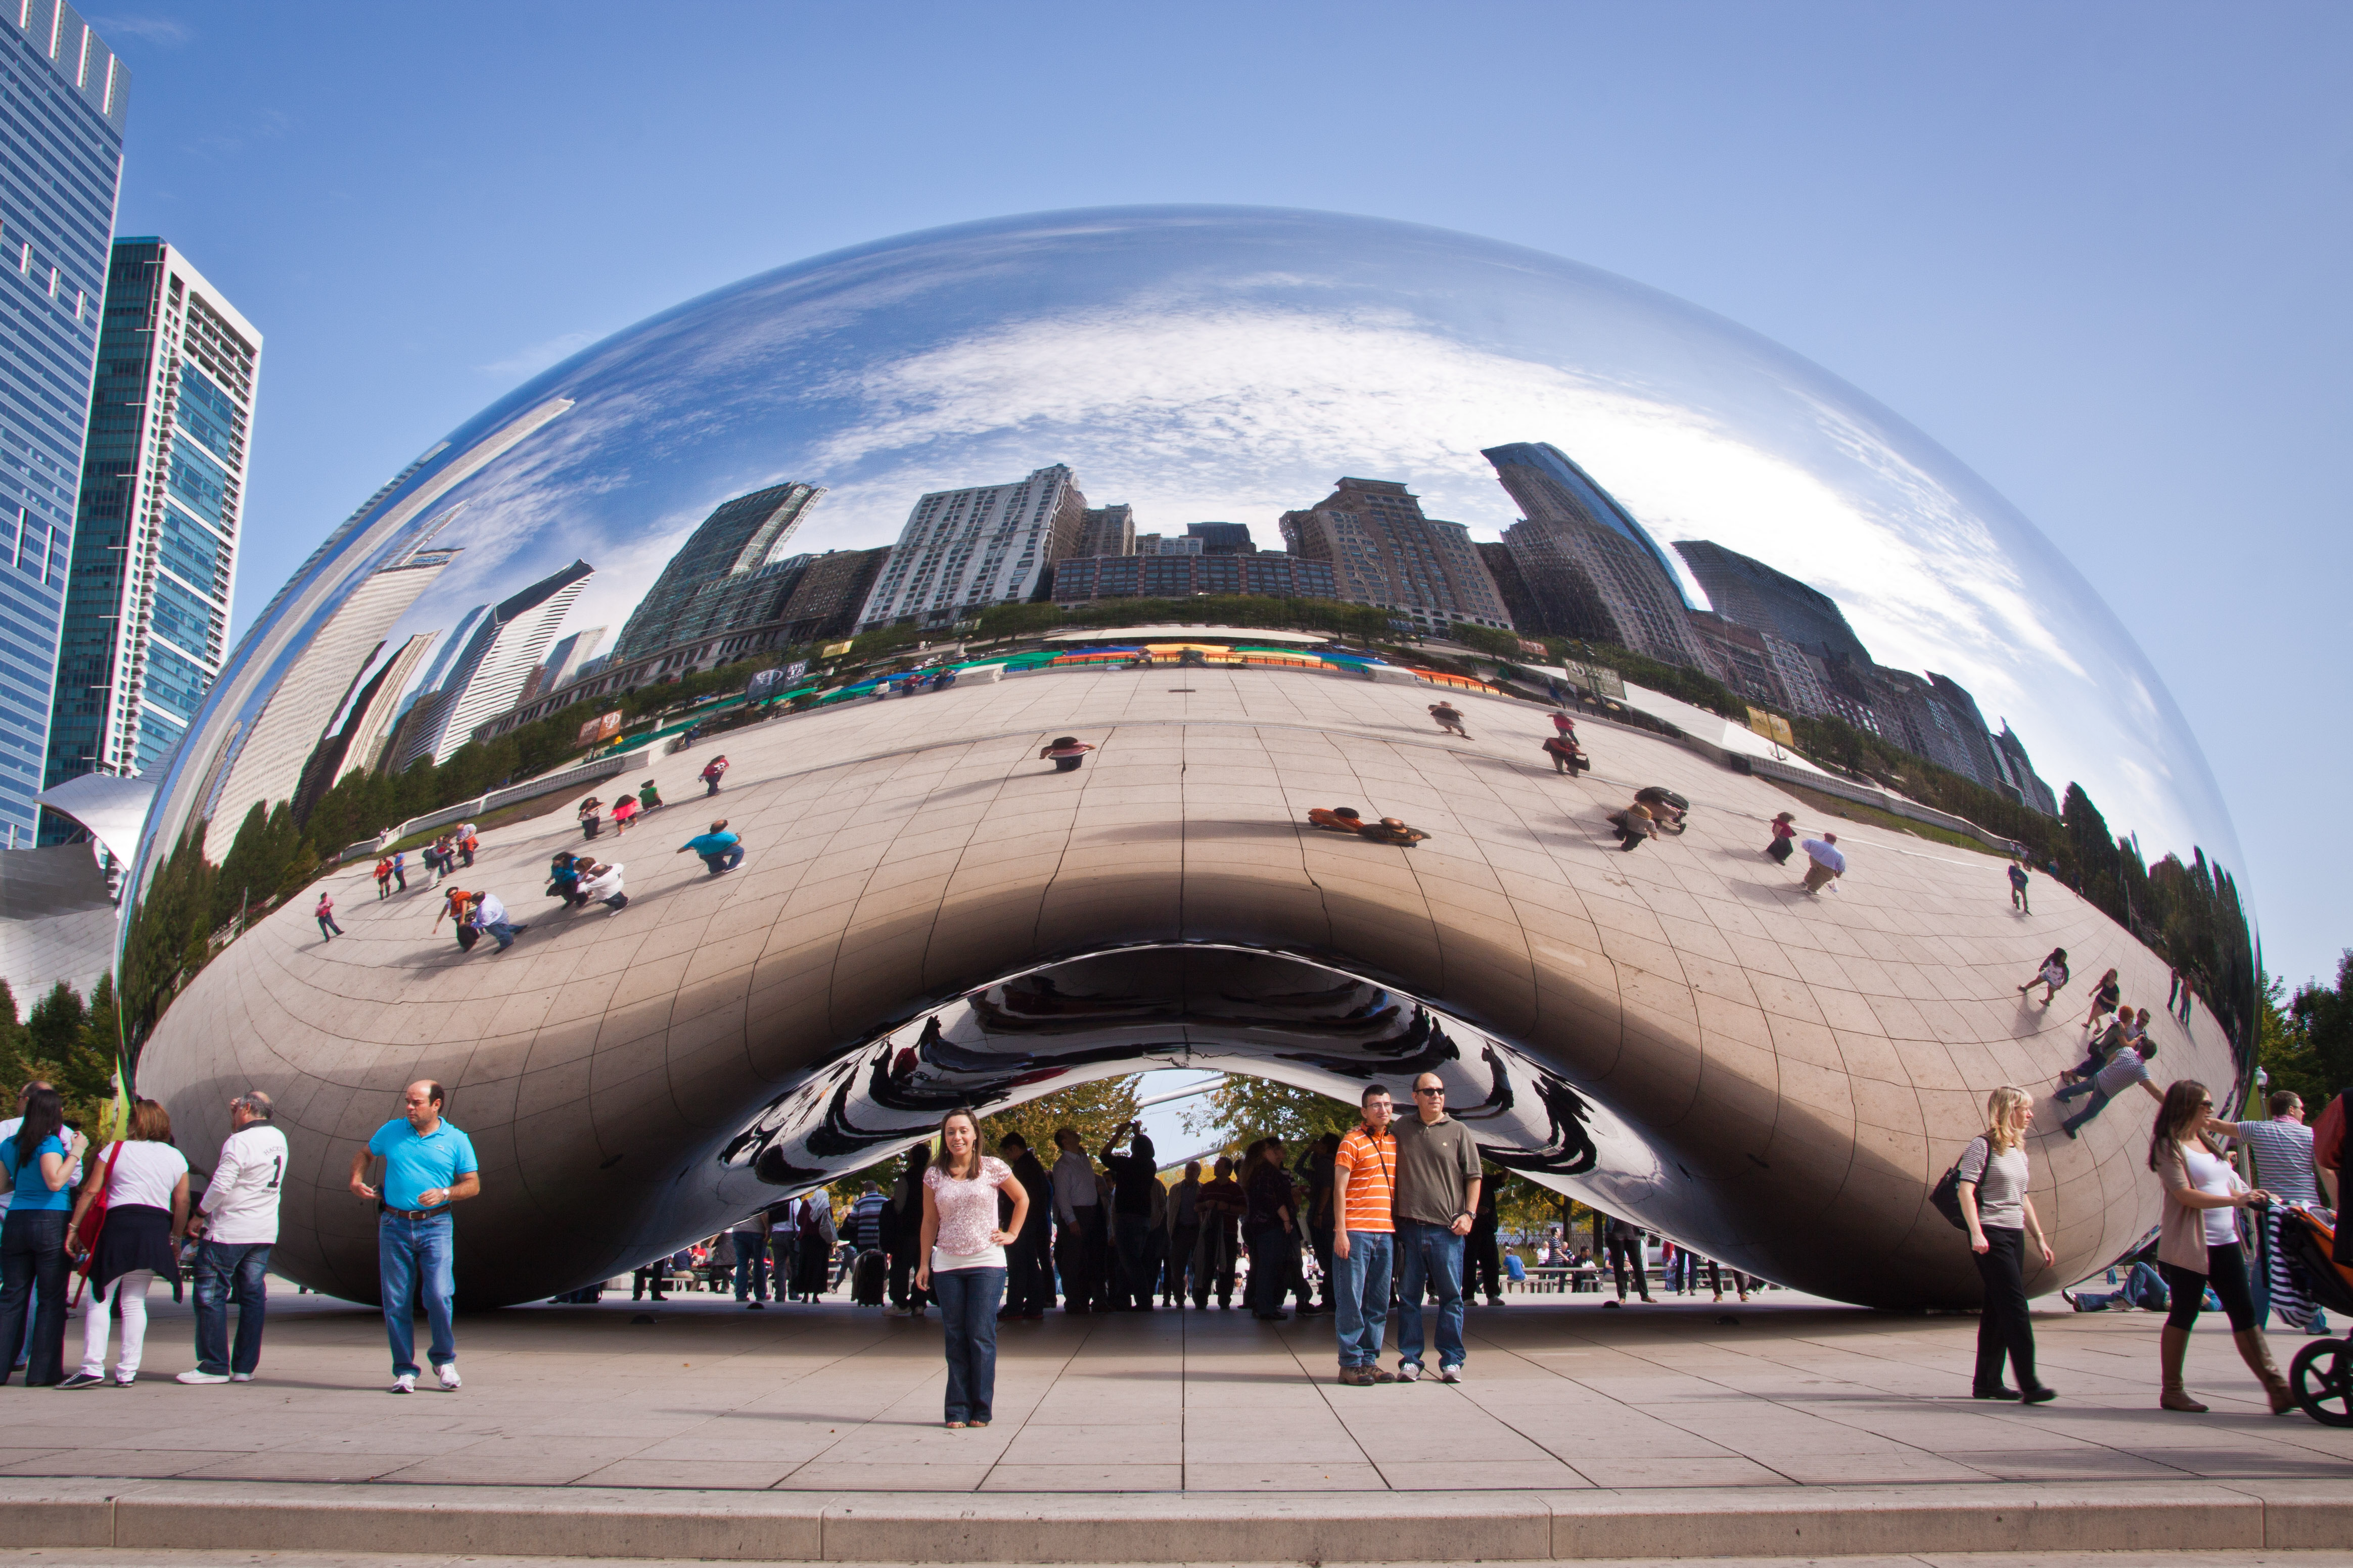
Cloud Gate On A Rainy Evening
My family and I try to get to downtown Chicago every year and we almost always visit the Cloud Gate (aka “The Bean”) in Millennium Park. We take goofy pictures in the reflections and pictures of other people taking goofy pictures of themselves. The shot above was taken at the end of our last visit to Chicago. It was cold and rainy but we were prepared with jackets, umbrellas, and a rain cover for the camera bag. The forecast for the day was sunny and warm early, turning to cold and rainy in the afternoon and for once the weatherman was completely correct. The shots below were only taken 5-ish hours earlier in the day. I liked how the blown-out sky and top of the bean blend together in the last shot. Someday I’ll get through all the photos and post some of the goofy ones.
The Bean Earlier In Day
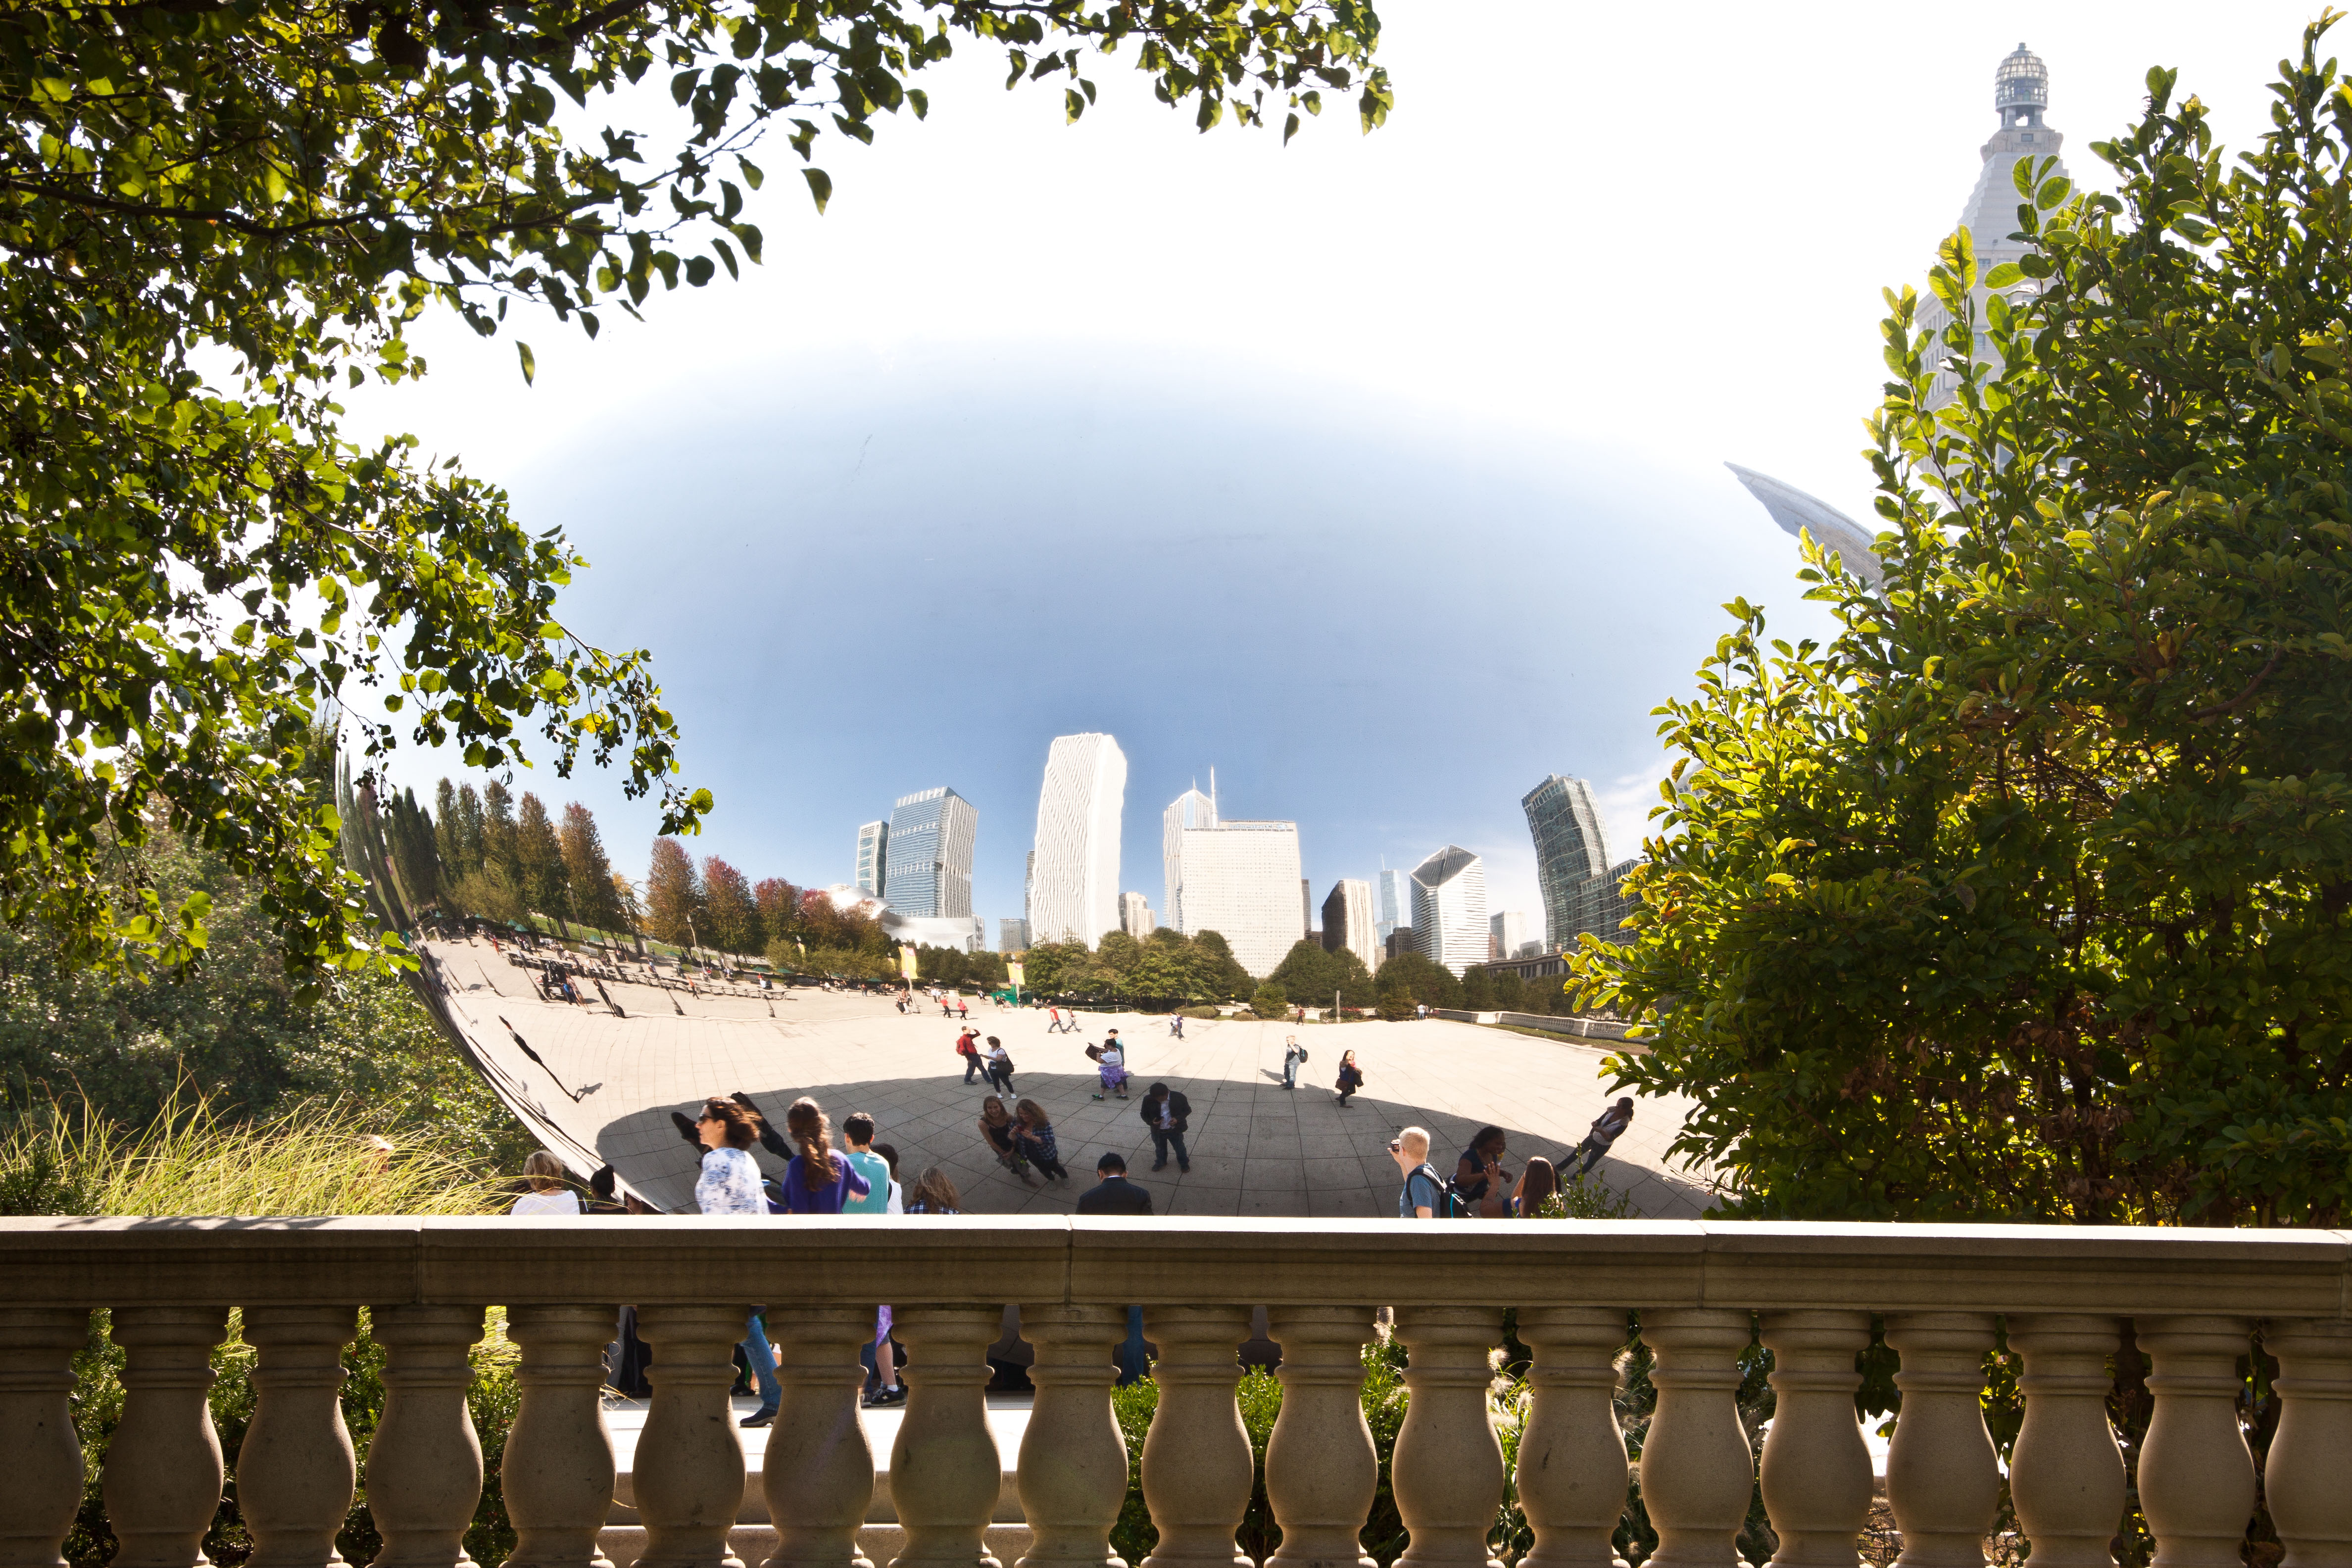
Sky Blends With Sculpture
Happy Independence Day!

Love 24mm, f/13, 20s
I wish I had a photograph with some deep meaning behind it (maybe I’ll come up with one tomorrow), but all I have is this shot taken two years ago. My wife was out of town over the July 4th holiday so I sent this to her. This was my 2nd or 3rd try — kind of challenging to write backwards neatly in the air.
Hope all my U.S. friends have a great holiday!
Honda

Honda 30mm, f/7.1
I’m making arrangements for another trip to Boston and it put in mind some of the photos I took on my last trip. While taking this photo of the Boston Skyline, a young couple pulled up on a motorcycle, parked it, and walked off to enjoy the view of the skyline across Boston Harbor. The bike had all sorts of accessory lights which cast a deep reddish-orange glow around it (see below but note the white balance isn’t quite right on the color version). I took some photos of it and generated this B+W HDR. There was a bit of noise in the result…I left it in, I kind of like it.

Milky Way, Central Texas Skies

Milky Way, Central Texas, 17mm, f/4, 30s, ISO 1600
Our family went on a great camping trip in Central Texas this past weekend. I woke up at about 5 am on Saturday morning and stepped outside to amazing skies. I thought to try my hand at some night sky photography but had no idea where my camera, tripod, and wide-angle lens were at the moment. Of course I was not about to shine a light and go looking for things, especially with our 4-month old soundly asleep. So, Saturday night I set the appropriate gear out in case I woke up early Sunday morning. I *did* wake up early and spent a bit of time trying to get some good images of the stars. I experimented with aperture, shutter speed, and ISO and found some reasonable combinations. Only later did I hear of the “600 rule” which says that for these night shots you should set your max shutter duration to 600 divided by your focal length if you want to avoid obvious star trails. My results roughly correlate with that. A quick internet search yields all sorts of information about night sky photography and post-processing by stacking images…I’ll leave it to you readers to do that research if you’re interested. I may dig deeper someday myself.
I tried a bit of light painting in an attempt to barely show the trees and add interest to the photo but all I had was a Streamlight brand flashlight (an amazingly bright little pocket flashlight which I highly recommend). I first of all didn’t want to disturb any campers and then even when I could shine the light away from other campers it was simply too bright to have reasonable control over the exposure.
I believe the glow on the horizon is from San Antonio. The city is quite far but a long exposure will pick that up quite a bit. The camera is definitely pointing toward the city.
In the image above you can see a faint shooting star to the lower left of the milky way clouds (kind of tough to see at this size). In the shot below I captured a more obvious shooting star but the overall image is kind of boring. I did minimal processing on these — noise reduction, slight contrast adjustments.

Shooting Star
Happy (Belated) Independence Day

Texas Capitol at Night 65mm, f/22, 1/8s, ISO 400
When we told my sister-in-law — twenty-two-ish years ago — that we were moving to Texas the first thing out of her mouth was, “Oh great, now your kids are going to have big heads!”. Turns out she was right as most of us pretty much love living in Texas. Truth be told, we would be happy living anywhere since life is more about the people around you than the place itself. In fact, not many years ago we passed on an opportunity to move the family to a place my wife had always dreamed of living. Her words: “This [Austin] is home now.” The pride of Texans is manifest in many ways. First, I’ve never been to a state where the state flag flies as much as it does here. People sport “Native Texan” tattoos and bumper stickers. Some transplants (not me) display bumper stickers which say “I wasn’t born in Texas but I got here as quick as I could”.
So, March 2nd was Texas Independence Day and I really didn’t plan on posting anything. However, in the wee hours of this morning — wide awake after a 2 am run to Walgreens for chicken pox relief potions for my son — I found some unprocessed pictures like the one above that I had taken on the way back to my truck after a recent photowalk on the University of Texas campus.
Some brief tidbits: Six national flags have flown over Texas (the origin of the “Six Flags” amusement park name). They were the Spanish, French, Mexican, Republic of Texas, Confederate, and now the US flag.
Texas is a huge state in land area — far larger than California which is the next largest in the lower 48. My big Texas head is not so large that I don’t get a good laugh at an Alaskan saying, “We were going to divide Alaska into two states but we didn’t want to make Texas the third largest”. That’s a pretty good put-down for too-proud Texans IMO 🙂
Texas also has very distinct geographical areas. When we lived in Illinois we constantly saw TV ads which used a slogan along the lines of “Texas — It’s like a whole other country.” Frankly, it’s true in many ways. We grew up equating Texas with tumbleweeds but I probably lived in Texas 15 years before I ever saw one. The regions range from plains in the north to hill country in the middle to plains and river valleys in the south. There are piney forests in the east to mountains in the west. The coastal plains with their fertile black soil are pretty much like the fields in Illinois.
I think we’ll stay a while.
Fire Dancer…Capturing Motion

Fire Dancer 50mm, f/7.1, 1/15s, ISO 1600
My wife and I (and several in her family) attended a luau while in Hawaii last week. I have no idea what an old traditional luau was like or how authentic the festivities were but in any case it was immensely enjoyable. Knowing that the main show would be after dark, I fitted my camera with my 50mm f/1.4 lens. Night photography has never been something I’ve been good at (maybe that can be said about all my photography 🙂 ). I’m always going back and forth with myself on the best combination for getting good exposures — shutter/aperture/ISO. Noise is always a consideration (not so much now that one of my bodies is a 5D Mkii).

For much of this show I wanted to mostly freeze the motion (like in the second shot above) so I shot in manual mode with an aperture between 1.4 and 2.8, shutter speed in the 1/500s – 1/640s range, and ISO 1600-3200 (the stage lighting varied from act to act and I tweaked settings accordingly). Depth of field wasn’t much of an issue because my focus point was quite far. However, I also spent time trying to capture some of the motion in the dances. I was shooting handheld so I did have to consider that when deciding how long to open the shutter. I played around with various shutter speeds and came out with some fun shots. For the fire shots I had hoped to be able to reduce the exposure enough to avoid blowing out the highlights of the flames completely but in doing so I ended up underexposing everything else much more than I liked. In the shot above I like the balance between capturing motion in the flame yet keeping some clarity in the dancer. Some shots blurred things more (see image below) and that’s interesting in its own right but I prefer the balance in the shot at the top of the post.
Processing was quite simple for all these shots. I shot with daylight white balance so that I effectively captured the colors consistently. The color turned out rather well. I used a bit of clarity and sometimes bumped the exposure up a hair in Lightroom. Finally, I exported from Lightroom with a preset that ran the images through a noise reduction action (using Noiseware) in Photoshop.


The Next Generation

The Next Generation 24mm, f/2.8, 1/125s, ISO 3200
We had a great bunch of little ones (three of whom are my children) gathered at a recent graduation party. I grabbed a hastily posed shot of some of them who happened to be playing near me.
I shot this using shutter priority and on-camera flash. I started out the night shooting with some off-camera lighting but it really got unwieldy due to try to take shots from all different directions (with no assistant). There was nothing but open sky above (and walls were too far behind me) so fixed bounce flashes was out of the question. I also tried a second remote flash for additional light and backlight but wasn’t satisfied with the results I was getting so I abandoned that. If I had the ability to bounce that flash I likely would’ve been happier with the second flash. Sometimes I use a 3′ sync chord and handhold my flash to get it off-camera but my cord went AWOL for a few weeks (it has since been located).
Since I was casually recording the event as a favor I wasn’t under pressure (except my own) to have “perfect” shots. This picture — and most of the rest — turned out fine IMO. Blue hour was just ending so I was able to retain some color in the sky even with the fast-ish shutter speed. A back light or rim light would have been really nice to separate the heads from the background but this was a quick candid afterall.
My camera was a Canon 5D mkii so high ISO was an available lever. I shot most of the evening using an ISO between 1600-4000. In the RAW files there is some noise — especially in the underexposed areas — but Noiseware is great at fixing that up. I can’t recommend Noiseware enough although I hear good things about programs like Noise Ninja and Topaz DeNoise too.
Cloud Angel In The Night Sky

Could Angel In The Night Sky 10mm, f/3.5, 30s, ISO 400
Last summer I took my 6 year old son camping for the weekend at Padre Island National Seashore (PINS…see this post, and this post). I didn’t do a lot of photography but managed a few shots to document the weekend.
The night shot that I recently posted from Big Bend National Park brought to mind some of the pictures I took at night at PINS. The shot above had some really cool clouds and it looked to me like an angel with its wings spread across the ocean (kind of sappy I know). The surf is always pounding down there but I like how the long exposure gives the Gulf a smooth look.
I can’t explain why, but the view of the stars from the beach is every bit as clear and amazing as the view in the middle of west Texas (which has some of the darkest skies in the US). Depending where you are on the beach you may be as close as 15 miles from Corpus Christi — a decently-sized metro area of about 430,000 people according to wikipedia. There’s a lot of glow from the city but on a cloudless night the Milky Way is as clear as ever (looks like clouds in the sky). Obviously this picture was taken with a bright moon which kills much of the view of the stars so there were no Milky Way pictures that night.
My goal was to make this image rather dramatic given the cloud formation and the processing steps to get there were rather simple. In Lightroom I removed a couple of stars within the angel shape with the spot removal tool. They detracted from the aesthetics of the overall image because they were too bright. [My opinion is that one is free to do this kind of thing as long as they don’t dishonestly portray the final result as 100% accurate]. Then in Photoshop I used the channel mixer to tone the image to a blue-ish monochrome — I didn’t want a straight black and white image. [David Nightingale’s tutorials have inspired a lot of experimentation with things like the channel mixer and with “dramatic” images in general]. I used a vibrance adjustment to back off on the blue a bit (couldn’t quite figure out the channel mixer settings to get the color just how I wanted it). I added one general s-curve and then another curve masked in to provide a touch of vignette. Some noise reduction and sharpening for the stars topped that off the Photoshop work. Once I was back in Lightroom I tweaked the color a tiny bit more because I wasn’t quite satisfied upon a second look.
Big Bend Night Sky

Stars and Clouds at Night, Big Bend National Park 24mm, f/2.8, 40s, ISO1600
I spent an enjoyable weekend with my oldest son in Big Bend National Park. It was hotter than blazes in the desert (110 in the shade the first day) but this was our only available weekend for many months. Frankly the heat wasn’t a big problem.
On past trips we’ve backpacked into the high Chisos Mountains but so far this summer all the mountain backcountry sites are closed due to extreme fire danger. So, we camped out in the Chisos Basin campground — enjoyed it very much actually. It was nice not having to lug a 50# pack full of water up into the mountains.
Before heading to bed one night I experimented with long exposures of the skies. I never did seem to find the “right” settings but got some fun shots nonetheless. The above shot of the mountain known as Casa Grande gives a sense of what the sky was like. That night there were clouds moving across the sky which annoyed me at first but they do add another dimension to the shot. This photo needs a frame to make it stand out from the page background…maybe later.
Water Fountain

Fountain and Traffic Bokeh 50mm, f/1.4, 1/30s, ISO 100
I made another dark o’clock airport run last week and brought the camera along to catch the sunrise blue hour on my way into the office. There were no clouds in the sky (boring) so I decided to swing by the Texas Capitol to take some shots of it against the colors of the sky. It turned out to be a gray hour rather than blue — no color at all so I was about to bag it completely. However, I did notice the reflections in this fountain at the corner of Congress and Cesar Chavez and stopped for some pictures. The above image was taken on the NE corner of the intersection looking east down Cesar Chavez. As the traffic lights (and the traffic) changed it provided many variations in the colors and this was my favorite. Processing was a handful of curves adjustments mainly.
The image below was a 3-second exposure at the same fountain but on the other side of the wall where the water cascades down into the courtyard. Processing was done in Lightroom — so minor that I really don’t even remember what I did 🙂
In truth, this fountain has endless photographic possibilities both as a subject and as a background. I’m sure I’ll be back some day.

Cascading Water 51mm, f/2.8, 3s, ISO 400
Blue Hour Baseball

Blue Hour Baseball 135mm, f/3.5, 1/250s, ISO 3200
I recently took in a high school baseball game in the role of the official photographer (filling in for Pete Talke). When on the first base side I often tried to get photos of a baserunner avoiding a pick-off when he took a big lead. I generally would prefocus near the base to avoid having autofocus go off in the weeds. There were a few decent images from the night and I decided to process this one with some textures in order to put into practice a few things I’d learned recently. This isn’t the most exciting image (other images had dirt flying, etc) but I chose it because both players are shown well and the coach is completely out of the frame. It also happened to be the “blue hour”, that time of deepening darkness after sunset when the sky has that deep blue hue.
First step: clone out the light poles from the original (shown with basic edits below). Had I been at a wide enough angle and the actual light fixtures themselves been showing I likely would have left them in as they would add that baseball park feel to the image. They were simply annoying in my framing.

Original image
I continued by choosing a few textures which had potential. Some were picked based on color, some solely on the actual texture (It’s “shape”? Not sure what words to use to describe that…). I loaded up the starting image and the textures and began experimenting. I blended in earthy-toned textures more heavily into the dirt and grass while using more blues in the sky. Some textures I incorporated into the whole image and some only in a portion. Blend modes used were overlay, soft light, and linear light. Below I show a screenshot of what I ended up with as layers and masks. There were many pleasing combinations and frankly it was hard to decide what direction to take at times. I also took the liberty of modifying the texture layers with the clone stamp in two cases. One example was the “Office” texture had some text in it which I found very nice until I added the skyline — just didn’t work so I cloned out the text. Some layers are more prominent than others as well — the second scratched copper layer was rotated about 30 degrees from the first then blended in but in truth is barely noticeable at all. I could probably remove that layer without changing the image much.
The skyline was added as an afterthought when I already considered myself done. My original intent with it was to use the layer (original skyline image is here) to create something similar to what an artist would sketch in pen then blend the hard pen strokes into the sky as another texture. However, I ended up using a gaussian blur of 5-ish pixels to soften it like the existing background then blended it in with a blend mode of ‘soft light’. Your mileage may vary but I like how it’s there but very subtle and not too distracting from the action. It’s not intended to look real but just add another element of texture to the image. [Artistic honesty disclosure: The Austin skyline is not visible from the Lake Travis High School baseball diamond…I added it in post in case that wasn’t abundantly clear]. Incidentally, the skyline layer is the same image which the Red Cross of Central Texas uses on their website.
I used 4 curves layers: A general s-curve, a darkening curve for parts of the image (luminosity blend mode), a lightening curve for a very small piece (could’ve just used the dodge tool), and another darkening curve for adding some vignette.
One last change I considered was adding a ball in-flight to the first baseman. I decided against for now because the only positions for the ball that I thought were natural seemed to unbalance the whole image IMO.

Scratched copper texture is from Tymcode
Office texture is from ArtByChrysti
Scratched rainbow texture is from Pink Sherbet Photography
Paper texture is from Visualogist
Arc de Triomphe in the Rain

Arc de Triomphe in the Rain
In my last post I extolled the virtues of my Canon 70-200 f2/8 L IS lens. Today I’ll point out one of the few positive things about my old Sigma 18-200 non-IS (or whatever Sigma calls their stabilization). What is that virtue? It’s so old and worn out that I don’t mind setting it down in a puddle in the middle of the Champs Elysee in Paris on a rainy night.
I ran out to the little bitty concrete island in the middle of the street and set the camera on the ground for some shots while traffic zoomed by. I added my folded-up camera strap under the lens to adjust the framing (I couldn’t look through the viewfinder b/c the camera was sitting right in front of a pole…and I didn’t want to get wet anyway). With a tripod and more time I would have framed this shot a little differently but I like it well enough. The water on the lens adds a nice effect too. Post-processing mostly amounted to the “punch” develop preset in Lightroom and some “recovery” slider action.
My not-quite-10-minute excursion to this concrete island was pretty much the extent of my “doing photography stuff” when I was with my wife during our Paris trip (I took one short photowalk while she was crashed in the hotel one evening). It was kind of nice not feeling the pressure of trying to work every shot, find the best angles, etc.
Did I mention we had an awesome time in Paris???
Austin At Night…Practicing HDR Processing

Thought I’d share a couple more night shots from the recent photowalk with Alex Suarez & Co in downtown Austin. Both shots are 3-exposure HDRs. The shot above shot is on 6th St. and shows a typical stretch of the club district before any crowd developed. The shot below shows the intersection of 6th and Congress from the vantage point of the parking garage.

6th and Congress (click to view on flickr)
I processed both of these mostly as an exercise in improving my work with night scenes. Even though I had abandoned tonemapping for some of my recent night shots, I found it to work reasonably well for both of these images. In truth, the main “skill” I learned was patience. Each image had to be worked on little-by-little in order to properly bring out certain details. Sometimes the original exposures needed processing to make them suitable for blending with the tonemapped layer. The skies needed to be masked in, noise needed some reduction (and then some masking to keep detail where necessary). I had to determine how I wanted to show the traffic (mostly still-ish or really bookin’?) — and then had to work to execute on what I decided. Lots of work around some of the lights…I spent a fair amount of time on these images, but it was enjoyable.
On a side note, while I processed these images I “watched” (half watched, half listened) some episodes of Foyle’s War. Look it up on the net. Really great show (available on Netflix).
Let me know how you like the images…or Foyle’s War.
Capitol Star

Star in the Capitol Gate
I always liked the stars that adorn the gates and fences on the Texas Capitol grounds. I played with variations of this shot for a while but couldn’t seem to capture what I really had in mind — both the star and the Capitol in focus, with this perspective. The formula may exist but I didn’t figure it out. The wide-angle lens (used for this shot) gave a perfect perspective but I had to use a focus distance which precluded a deep depth-of-field. Stepping back with the wide lens pulled in some out-of-balance elements (IMO) of the gate unless I centered the star (blocking the Capitol building). Tried the 24-70mm but the bit of added compression in perspective wasn’t quite to my liking. That compression does help square up the star and Capitol relative to each other but again, it wasn’t what I was after.
I decided to post the shot anyway — still an interesting shot IMO and I hope you enjoy it. It’s interesting how the tonemapping process turns the background blur into a somewhat dreamy scene while keeping the star a nice, realistic focus point. I might experiment with this shot again someday.
UT Tower In Orange

UT Tower In Orange
A friend called up this afternoon to let me know that a “photographic opportunity” was coming up this evening. The University of Texas Men’s swim team had won the national championship so the UT Tower was being lit orange tonight in their honor. Now, I’m not a huge UT fan (flame away) but as a photographer I recognized that it truly was a unique chance to get a great image. I really felt like staying home for the evening (my wife and I had bagged some errand plans for that very reason).
My wife reminded me that I’d regret not going so I packed up and went to campus with one of my daughters. The weather was perfect and we had a great evening out. I even took some street portraits for some ladies who wanted their picture taken with the tower in the background. They were quite the jokesters — “I want my head put on Sandra Bullock’s body…I want so-and-so’s body…Do a lot of that soft-focus thing on my face”. We had a good time.
The image above was generated by taking four manual exposures then using Photomatix to fuse the exposures (no tonemapping). I used to darkest exposures to bring back a few highlights. I’ve only played with fusing exposures a little, but I’ve found it to generally produce a nice, clean image. If fusing did not work out I would probably have gone the composite route (manually blending the exposures in Photoshop). I didn’t even try tonemapping as I often don’t like it much for night shots. I added some sharpening a smidgen of clarity in Lightroom. That’s all I did — no noise reduction, no curves.
I hope all you UT fans like this photo. Well, I hope you all like the photo…
To HDR or Not to HDR…
[Yes, I know the more proper title may be “To Tonemap or Not to Tonemap” but it just doesn’t sound as good]
HDR is fun — a downright blast I’d say. It’s very easy to get caught up in it to the point where you (1) always bracket your shots and (2) always tonemap in Photomatix or similar software. Why? The images are often stunning.
Lately I’m finding more and more high-dynamic-range situations where tonemapping isn’t my preferred option. Take, for example, these exposures of 6th Street in Austin taken on a photowalk organized by Alex Suarez during SXSW. I wanted to tone down the intensity of some of the lights yet show detail in other areas.

Three 6th Street Exposures
After tonemapping, I got this:

Tonemapped image
I played with combinations of settings and some were better than others. In the end though, no tonemapping settings produced an image which I was personally happy with. I decided to start with my center exposure as the base layer and see what I could do with it. I rather like the final result and I’ll explain below how I processed it. I’m sure there are better ways to do this but frankly I’m a CS4 novice and this fits in my current skill set.

6th Street At Night (click to view on flickr)
Here’s the short description of what I did: I started with the layer which contained the normal (“0”) exposure on top. I placed the -2 exposure underneath, created a layer mask and blended the darker layer into some of the blown-out areas (neon signs for example). I darkened a few other spots according to my taste as well. Using the same masking process I blended in parts of the +2 exposure to bring out some detail in the shadows — went very easy on this because I still wanted this to look like a night shot under the streetlights. I also played with all the layers to get the look I wanted with the moving traffic.
Next, I had to do something with the people on the sidewalk. Ideally I would have taken them from the normal exposure but there was too much motion blur. The only acceptable exposure from this standpoint was the -2, but the subjects were far too dark. I simply duplicated the -2 layer and gave it some treatment — bumped up the exposure, played with the contrast, etc. — in order to make the sidewalk and people roughly match the normal exposure. This allowed me to blend them in reasonably and obtain the (roughly) still look I wanted. I also used that layer to touch up a few other areas. One of the guys in the foreground still ended up without an arm…but I worked with what I had and he was moving in all the exposures 🙂
Of course I finished off with curves, sharpening, etc.
So, that’s it…I hope you like the shot and I also hope I’ve inspired some simple non-HDR experimentation. I’d love to hear your comments, particularly related to what approach you might have taken to process a shot like this.
